lunes, 15 de diciembre de 2014

"Salsa blanca" cremosa vegana de hongos de Acción de Gracias / Creamy Mushroom Thanksgiving Gravy


INGREDIENTES:

2 tazas de caldo hongos / vegetales (casero o la marca Pacific funciona muy bien)
2 tazas de leche soya (sabor neutro) / leche de almendras (sin sabor vainilla, mejor casera)
6 cucharadas de harina blanca
1/4 taza aceite de oliva extra virgen
Sal
Pimienta negra
Pelín de nuez moscada en polvo

Ponga el aceite de oliva a calentar en una sartén grande. Cuando esté bien caliente, agregue la harina y mezcle rápidamente. Use una cuchara de madera. Cuando espese, agregue la leche y el caldo, la sal, pimienta y la nuez moscada. No deje de mezclar en ningún momento porque se hacen pelotas rapidísimo. Mi profesora de cocina italiana, Isabel Campabadal recomienda mezclar haciendo la figura del ocho para asegurarse de que quede bien sedosa la salsa blanca.
Cuando espesa se ve así:

Apenas hierva y se ponga bien bien cremosa está lista! Cómala sola o incorpórela a recetas como lasaña, casseroles* o canelones veganxs! (A Kaelan le encanta sola y es mil más saludable que la salsa blanca tradicional) Provecho!

*A continuación una entrada del famoso casserole de vainica de Moni! Especial para el Día de Acción de Gracias!!!

_____________________________________________________________________


INGREDIENTS:
2 cups mushroom / vegetable broth
2 cups soy milk / almond milk (not the vanilla kind)
6 spoonfuls white flour
1/4 cup extra virgin olive oil
Salt
Black pepper
Touch of ground nutmeg

Heat up the olive oil in a large saucepan and add the flour when really hot. DO NOT stop mixing and use a wooden spoon for extra smoothness. Once this mixture thickens, add the broth and the milk, the salt, pepper and nutmeg, still mixing constantly. My Italian cuisine teacher, Isabel Campabadal, recommended mixing the gravy with the wooden spoon making the figure eight to make sure you avoid all lumps.


As soon as the gravy thickens the second time, it's good to go! Eat it by itself (Kaelan's absolute favorite!) or use it as a main ingredient in vegan lasagna, casseroles* or pasta dishes. Enjoy!!!

* A following post describes Moni's fave Thanksgiving green bean casserole recipe!!!

domingo, 7 de diciembre de 2014

Rollos de manzana veganos de Acción de Gracias / Vegan Apple Thanksgiving Rolls


INGREDIENTES:

Masa:

3 tazas de harina blanca
2 cucharaditas levadura
1/2 taza agua tibia
Pizca de azúcar
3/4 taza aceite de oliva extra virgen
1/2 taza de azúcar cruda orgánica

Relleno:

5 manzanas gala (peladas) medianas en cuadritos
Jugo de un limón mesino
1/2 taza de azúcar cruda orgánica
1/4 taza agua
2 cucharaditas de canela

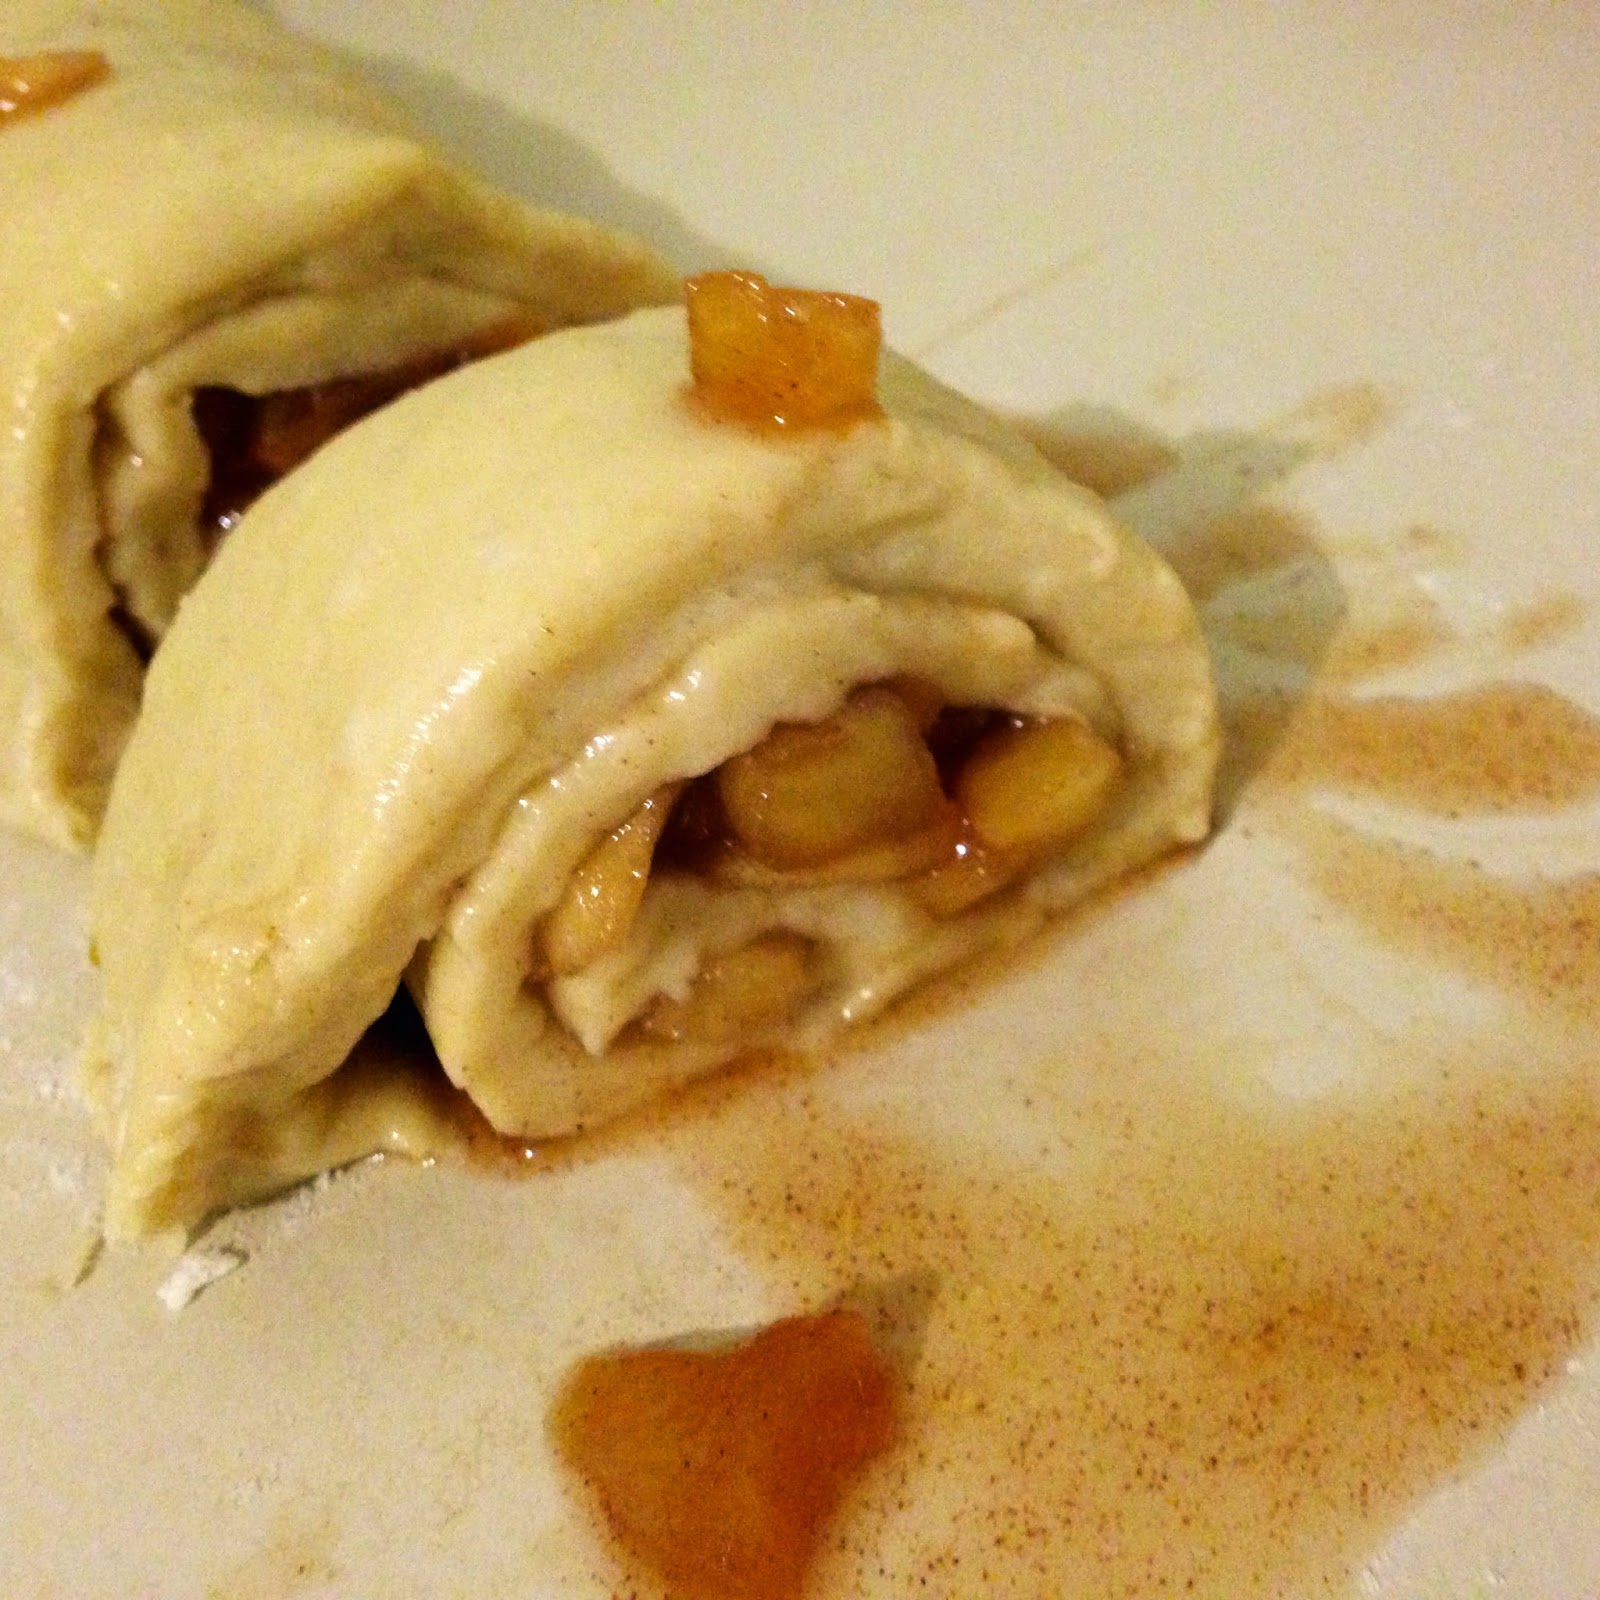
Para hacer la masa se pone el agua tibia con la levadura y la pizca de azúcar a crecer. Déjela tapadita en un lugar caliente como por 10 minutos. Esto debe crecer; así sabemos que se activó la levadura. Luego se mezcla todo y se amasa hasta ver huequitos en la masa (como en la foto). Para que esto suceda se amasa como 5-7 minutos.


Para hacer el relleno se ponen todos los ingredientes en un sartén a fuego medio revolviendo constantemente (NO se descuide!) hasta que se reduzca el líquido a menos de la mitad.


Para el ensamblaje...

1. Con un rodillo extienda la masa en forma cuadrada y agregue el relleno cuidadosamente.


2. Tome el borde de la masa con cuidado y empiece a enrollar.


3. Deje el rollo con dos dedos de grosor más o menos.


4. Corte los rollos individuales con mucho cuidado con un cuchillo de sierra porque sino se despapayan. 


5. Cocínelos a 350 grados de 20-30 minutos o hasta que estén dormidos por encima. 

Provecho!!!

_________________________________________________________________________


INGREDIENTS:

Dough:

3 cups white flour
2 tablespoons yeast
1/2 cup warm water
A pinch of sugar
3/4 cup extra virgin olive oil
1/2 cup organic raw sugar

Filling:

5 medium yellow apples (peeled and cubed)
The juice of one lime
1/2 cup organic raw sugar
1/4 cup water
2 teaspoons cinnamon

To make the dough mix the pinch of sugar and yeast in the warm water and set aside covered in a nice warm spot for around 10 minutes to activate. When it does, it will grow in size. Then mix it with the flour and the rest of the ingredients and knead for around 5-7 minutes or until the dough shows little air holes (like in the picture).

To make the filling simply mix all the ingredients together and cook over medium fire in a pan until the liquids are reduced to less than half. You have to pay attention to it and mix it constantly with a spoon until bubbly.


To assemble...

1. Roll the dough out to a square shape and carefully spoon in the filling close to the edge.


2. Take the edge carefully with your fingers and start rolling slowly.


3. The roll has to end up something like two fingers wide.

4. Cut each individual roll with a serrated knife; otherwise, you'll for sure end up with a bloody mess and have to start over again.

5. Bake at 350 degrees 20-30 minutes or until golden brown.

Enjoy!!!

Thanksgiving Vegan Rosemary Mashed Sweet Potato and Potato Blend / Puré de papa y camote vegano con romero de Acción de Gracias


INGREDIENTES:

5 papas grandes de cáscara roja
3 camotes medianos (variedad naranja)*
2 tazas caldo de hongos o vegetales (ojalá casero)
Romero fresco al gusto, picado finito
1/4 taza aceite de oliva extra virgen
Sal y pimienta negra

* Esta variedad es anaranjada por dentro. Se consiguen en la Feria Orgánica de Aranjuez pero en caso contrario, use los camotes más dulcitos que encuentre, de la variedad corriente.

Me gusta usar papas y camotes orgánicos porque así les puedo dejar la cáscara, rica en aminoácidos. Si no es posible utilizar orgánicos, pues utilice los regulares, eso sí, bien pelados. Ponga las papas y los camotes en trozos a cocinar (la olla multiuso o la de cocimiento lento son un buen plan) en el caldo de vegetales o de hongos. Este es el trucazo para el sabor maravilloso final. Complete el líquido de la olla con agua para cubrir la papa y el camote totalmente y agregue sal y pimienta negra.

Cocínelos hasta que estén bien suavecitos. Póngalos en un recipiente de vidrio y estrípelos con un tenedor (o uno de esos implementos sofisticados que yo no tengo). Para obtener buena consistencia, agregue el líquido de la olla y el aceite de oliva extra virgen. Por último incorpore el romero picadito. A mí me encanta el puré grueso estilo chunky, sobre todo porque cómo les dije, yo lo hago con las cáscaras de todo, pero pues si a usted le gusta bien liso, pues genial (aburrido, pero es su derecho). Provecho!

________________________________________________________________________


INGREDIENTS:

5 large red potatoes
3 medium-sized orange sweet potatoes (if possible)
2 cups vegetable or mushroom broth (better if homemade)
Fresh rosemary to taste, chopped very finely
1/4 cup extra virgin olive oil
Salt and black pepper

I prefer to use organic potatoes and sweet potatoes so I can leave their skin on, rich as it is in healthy amino-acids, but if you can't find them and have to use the regular ones, just make sure that you peel them well. Cook them until soft in the vegetable or mushroom broth: this is the trick to the wonderful final flavor. You can use the slow cooker or the multi-level pot. Complete the broth with water until the potatoes and sweet potatoes are covered and add salt and black pepper.

Transfer the veggies to a glass bowl and mash with a fork or any of those sophisticated implements that I don't have. I like my mashed taters chunky, especially cause I love the skins in them, but if you like them super smooth (and boring) that is your right! For consistency, use the broth and the extra virgin olive oil. Add the chopped rosemary at the end and enjoy!


domingo, 16 de noviembre de 2014

Queso vegano feta de almendras / Vegan Almond Feta Cheese


INGREDIENTES:

2 tazas almendras germinadas (ver entrada anterior)
1/2 taza de jugo de limón mesino
5 cucharadas de aceite de oliva
4-5 dientes de ajo
1 1/2 cucharada de sal marina molida*
1/2 taza de agua

Esta receta la basé en la que me encontré en www.maplespice.com (recomendado 100%). Esta es la versión criolla ya probada, lo cual es precisamente el punto de este blog! (Abrazo virtual para mí.) Además el mío es con almendras germinadas lo que aumenta los nutrientes y baja el contenido graso. OK. Veámoslo paso por paso. De veras suena enredado pero no lo es y además no es por nada pero es EXQUISITO. Yo ya tengo mis almendras germinando permanentemente porque por acá se desapareció en 10 maravillosos minutos...

1. Muela las almendras (con todo y cáscara, sí) en el procesador de alimentos. Si no tienen y su licuadora es aunque sea semi pichuda, delen. Yo creo que si le echan poquitos de agua para ayudarla realmente no afecta el sabor final.


2. Licúe todos los ingredientes con las almendras molidas. Bastante, tipo 7 minutos, para que quede bien bien mezclado todo. 


3. Ponga dos capas de tela en dos platos hondos de tomar sopa. Esta tela puede ser manta delgadita, con buenos poros, como la que se ve en las fotos. La idea es que se vaya saliendo el líquido de la mezcla. Yo compré la mía en una pasamanería en Moravia.


4. Divida la mezcla en los dos recipientes y amarre las telas encima con una liga de plástico.


5. Deje los platos hondos con las mezclas en la refrigeradora por 12 horas.

6. Retírelos de las telas con mucho cuidado y hornéelos por 40-50 minutos a 350 F (póngalos con el lado "bonito" liso para arriba.)


Proceda a disfrutar de la delicia absoluta!!! En tostaditas, en pizza vegana, con su pasta favorita... lo que sea. Disfrútelo!


* Pueden perfectamente usar sal corriente!
_______________________________________________________________________

INGREDIENTS:

2 cups boosted almonds (see previous entry)
1/2 cup juiced lime 
5 tablespoons extra virgin olive oil
4-5 garlic cloves
1 1/2 tablespoon ground sea salt*
1/2 cup water

I based this recipe off one I found at www.maplespice.com (awesome recipes, by the way). This is the Costa Rican-tested version, which is the whole point of this blog! (Virtual hug for me.) Plus, my cheese calls for boosted almonds: more nutrients, less fat. OK. I'm gonna walk you through step by step. It sounds complicated but I swear it is not really and it is DELICIOUS. I know have almonds in water permanently cause this thing was gone in 10 glorious minutes...

1. Grind the almonds in your food processor (skins and all, yes). If you don't have one and your blender is even semi kick-ass go for it. I think even if you add a little water to help it out it won't affect the final flavor.

2. Blend all the ingredients with the ground almonds for about 7 minutes until super smooth.

3. Put three layers of cheesecloth or two of a fine "manta" cloth in two glass soup bowls.

4. Divide the cheese mixture in the two bowls and tie the cloths with a plastic rubber band.

5. Leave the bowls in the refrigerator for 12 hours.

6. Take them out gently and bake them (smooth side up) for 40-50 minutes at 350 F. 

Go ahead and ENJOY! This cheese is divine on toast, vegan pizza, your favourite pasta... you name it. Yummy!  

*Of course you can use regular salt as well.

Leche de almendras / Almond milk


INGREDIENTES

1 taza de almendras germinadas (ver entrada correspondiente)
1 taza de agua fresca

Licuar hasta que se haga la leche. Luego se cuela utilizando un colador de leche vegetal o simplemente un pedazo de tergal con elástico. Las cantidades las puede variar de acuerdo a la cantidad de leche que necesite. Simplemente la misma cantidad de agua y de almendras.

TOQUEZAZO: NUNCA bote la broza que queda en el colador después de hacer la leche! Puede hacer harina, añadirla a patés de garbanzos o lentejas activadas, agregarlas a aderezos para ensaladas, batidos, pasta, o inclusive hacer galletas crudas!

_____________________________________________________________________

INGREDIENTS

1 cup boosted almonds (see previous entry)
1 cup fresh water

You simply blend it until the milk is done. Then you strain it using a vegetable-milk strainer or a piece of cheesecloth or similar fabric with plenty pores. You can vary the quantities depending on how much milk you need. Just make sure that you have equal parts almonds and water.

BOOM! NEVER through out the remainder almond chow left in the strainer! You can make flour, add it to boosted chickpea or lentil spreads, make salad dressing, throw it into a smoothie or pasta or even make raw vegan cookies!


Almendras germinadas / Boosted almonds


INGREDIENTES

Almendras con cáscara
Agua

Como aprendí en el curso de Ariana Morales!

1. Poner las almendras en un tarro de vidrio cubierto con un pedacito de tul y una liga.
2. Lavar las almendras CINCO veces dentro del mismo tarro.
3. Dejar activándose un mínimo de 48 horas.
4. Lavarlas CINCO veces dentro del tarro dos veces al día y cambiarles el agua.

___________________________________________________________________________

INGREDIENTS

Whole almonds
Water

As I learned it from Ariana Morales!

1. Put the almonds in a glass jar covered with a piece of tulle and a rubber band.
2. Wash the almonds FIVE times inside the jar.
3. Leave in water boosting for at least 48 hours.
4. Wash them FIVE times inside the jar twice a day and leave them in fresh water.

Picadillo vegano semi-crudo de plátano verde / Semi-Raw Vegan Green Plantain Picadillo


INGREDIENTES:

4 plátanos verdes grandes
1/4 taza de cebolla blanca picadita fina
4 dientes de ajo 
1 cucharada de aceite de coco
2 tazas de zanahoria orgánica rallada
1 tomate orgánico grande en cubitos
3 ramitas de apio orgánico picadito fino
1 chile dulce orgánico picado grueso
1/4 taza de cebollín picado fino (incluyendo las hojas)
1/2 taza de lentejas o garbanzos acitivadxs (ver entrada correspondiente)
1/4 taza de alcaparras (opcional)
1/4 taza de jalapeños en trocitos (opcional)
 
 Esta receta la inspiró una que me pasó Caro Alfaro. Los plátanos se hierven en agua con sal y luego se ponen en la refrigeradora para que se pongan duros (ja ja) y se dejen rallar. De hecho yo andaba en carreras y los metí al congelador 20 minutos mientras picaba todo lo demás y eso bastó. Se sofríe el plátano rallado en aceite de coco con el ajo y la cebolla blanca. Al final se mezclan todos los ingredientes muy bien (espérense a que se enfríe la mezcla de plátano para no arruinar los maravillosos nutrientes de los vegetales crudos) y se adereza con jugo de limón y aceite de oliva extra virgen. Como podrán ver a Kae le encantó! Provecho!


__________________________________________________________________________

INGREDIENTS

4 large green plantains
1/2 cup finely chopped white onion
4 garlic cloves
1 tablespoon coconut oil
2 cups grated organic carrots
1 large organic tomato, cubed
A bunch of organic celery, finely chopped
1 organic bell pepper, chopped
1/4 cup scallions, finely chopped
1/2 cup boosted lentils or chickpeas (see previous entry)
1/4 cup capers (optional)
1/4 cup chopped jalapeño peppers (optional)

I created this recipe based on one shared by Caro Alfaro. Boil the plantains with a little sea salt, then refrigerate them until they get hard (ha ha) so that they are easy to grate. I actually just stuffed them in the freezer for like 20 minutes because I was in a hurry and they worked just fine. Then you sautée the grated plantains in coconut oil with the white onion and the garlic. In the end you just miz all the ingredients together (wait until the plantain mixture cools down so you do not ruin the nutrients of the raw ingredients!) and season with lime juice and extra virgin olive oil. As you can see, Kaelan Loved it! Enjoy!


Lentejas / garbanzos activadxs / Boosted Lentils / Chickpeas


INGREDIENTES

Lentejas / Garbanzos secxs (de lxs que se compran en el supermercado)*
Agua

Gracias a Ariana Morales por el conocimiento! 

1. En un recipiente de vidrio limpio coloque las lentejas / garbanzos.
2. Cubra el recipiente con un trozo de tul y fíjelo con una liga. (Si no tiene tul y además para reciclar, puede usar un trozo de la red en la que vienen empacados los ajos.)
3. Enjuague las lentejas 5 veces dentro del mismo frasco.
4. Deje las lentejas en agua activándose por 12 horas.
5. Enjuáguelas una vez más, retire el agua y déjelas germinándose al aire a un ángulo de 45 grados (para que escurra el exceso de agua) por 24 horas, lavándolas dos veces al día.
6. Están listas para comer / utilizar cuando tienen "rabito" visible.


Las lentejas / garbanzos activadxs se potencian hasta un 400% en sus nutrientes, son más digeribles y además se consumen crudxs--también son BARATXS. Son un ALIMENTO VIVO maravilloso!

*La cantidad de lentejas / garbanzos depende de cuánto ocupa y el tamaño del recipiente. Es importante saber que las lentejas / garbanzos se ponen gordxs. O sea, NO llene el tarro hasta arriba. Deben tener espacio para "engordar."

_____________________________________________________________________


INGREDIENTS

Dry lentils / chickpeas (the ones you buy at the store)*
Water

Thanks to Ariana Morales for the knowledge!

1. Place the lentils in a clean glass container.
2. Cover the container with a piece of very breathable cloth (for instance the net-like material in which they sell garlic in the store.)
3. Rinse the lentils five times in the container itself.
4. Leave the lentils "activating" in water for 12 hours
5. Rinse one more time, remove the water, and let lentils continue to "activate" in the air in the same jar, at a 45 degree angle (so that the excess water can drain) for 24 hours, again, rinsing twice a day.
6. They are ready to eat when they have a visible "little tail."
Boosted lentils / chickpeas increase their nutritional value up to 400%, they are much easier to digest and they are a raw food--and CHEAP! They are LIVE FOOD and they are a WONDERFUL addition to your regular diet!
*The quantity of lentils / chickpeas depends on how much you need and the size of the glass jar. Also, please know that boosted lentils / chickpeas get super fat. That is, DO NOT fill up the jar. They need room to "fatten" up. 


viernes, 31 de octubre de 2014

Adri's Quick Vegan Pesto / Pesto vegano rápido de Adri


 INGREDIENTES:

2 tazas de albahaca fresca orgánica
1 taza de perejil fresco orgánico
Jugo de 2 limones (mesinos)
1/2 taza de almendras
1/2 taza de nueces
1/4 - 1/2 taza de aceite de oliva extra-virgen
6 dientes de ajo
Sal
Pimienta negra

Va todo para la licuadora o el procesador de alimentos. Se pone más o menos aceite de oliva y / o jugo de limón dependiento de cómo se vayan integrando los ingredientes. Ojo a que NO quede muy líquido. Es mejor parar la licuadora y raspar los lados con una cuchara mil veces a que quede un jugo verde. A este pesto le pondría corazoncitos si pudiera porque es súper rico, se hace en 10 minutos y tiene bastantes nutrientes. Yo se lo pongo a cualquier tipo de pasta o a papitas salteadas además de en tostadas (o estilo Kaelan: de cucharada en cucharada!) Guárdenlo en un lindo tarro de vidrio para conservar mejor los sabores. Provecho!

_____________________________________________________________________

INGREDIENTS:

2 cups fresh organic basil
1 cup fresh organic parsley
The juice of two limes
1/2 cup almonds
1/2 cup walnuts
1/4 - 1/2 cup extra virgin olive oil
6 garlic cloves
Salt
Black pepper

Blend everything or use your food processor. You can add more or less olive oil and / or lime juice depending on how it all comes together. This pesto should most definitely NOT end up too liquid-y. You'd better stop the blender a couple times and scrape the sides or you'll end up with soupy green juice! I would color this pesto with lots of little green hearts if I could because it's done in 10 minutes; it's super yummy, and it has a lot of healthy nutrients. I add it to any type of pasta or pan-fried mini potatoes, or just spread on toast--or Kaelan style: by the spoonful! Store in a lovely glass jar to preserve it better. Enjoy!


domingo, 26 de octubre de 2014

Super Simple Vegan Chocolate Mud Pie / Pastel Chocolatoso Vegano Súper Fácil


(Monica basó esta receta en la original de Gena Hamshaw)

INGREDIENTES:

1 paquete de Tofu (en los supermercados está a la par de los quesos, al ser queso de soya)
1 barra / 300 gr de chocolate semi-amargo (usamos la marca Torras 70% cacao)
1 base de pastel de galletas Oreo *
1 cajita de fresas orgánicas
1 y 1/2 cucharadita de vainilla
1/4 taza de aceite de coco derretido
4 cucharadas de sirope de maple
2 cucharadas de azúcar cruda orgánica
3 cucharadas de leche de soya o de almendras

El chocolate se derrite en baño María y se usa hasta que esté a temperatura ambiente. Luego se mezclan todos los ingredientes menos el chocolates en la licuadora hasta que estén bien integrados. Lo último que se agrega es el chocolate. La pasta debe quedar súper cremosa. 

En la concha del pastel se pone una base de fresas, las cuales van rebanadas a lo largo. Las tajaditas más pequeñas no se usan... mejor comérselas! La cosa es que todas las tajaditas queden iguales. Luego se vierte la pasta en la concha sobre las fresas y se ponen el resto de trajaditas encima como se ve en la foto.

Luego va para la refri un mínimo de cuatro horas hasta que esté bien firme. No les miento cuando les digo que es decandentemente exquisito... Provecho!

* Se puede hacer la base del pastel también nada más pulverizando galletas Oreo con un poquito de aceite de coco y estripándolas sobre el plato de pastel.

____________________________________________________________________

INGREDIENTS:

1 pack of Tofu (next to the cheese in the store)
1 bar / 300 gr semi-sweet chocolate (we use Torras 70% cacao)
1 Oreo pie crust *
1 pack of organic strawberries
1 y 1/2 teaspoon vanilla extract
1/4 cup melted coconut oil
4 tablespoons maple syrup
2 tablespoons raw organic sugar
3 tablespoons soy / almond milk

Melt the chocolate on a double-boiler and set aside to cool. Blend the rest of the ingredients until super smooth and silky. Add the chocolate last and blend.

Coat the base of the pie crust with sliced strawberries (slice them lengthwise and eat the smaller slices so that they are all the same size), then gently spread the pie mixture on top of the strawberries, and then top with more strawberries as shown in the picture.

* You could also make the pie crust yourself by crumbling Oreo cookies and adding some coconut oil and pressing the mixture into the pie dish. I'm not lying if I tell you this is the most decadent and absolutely delicious chocolate pie I have ever had! Enjoy!